Venture into the World of Coding
The world of coding — a place where you’ll speak a language that computers actually understand. Whether you’re here for the thrill of data analysis, building websites, or automating tasks (because who doesn’t love making a machine do all the work?), you’re in the right place.
Watch the recording from this session from 24 Feb 2025 and checkout the related slides within our Google Drive.
Meet the Languages
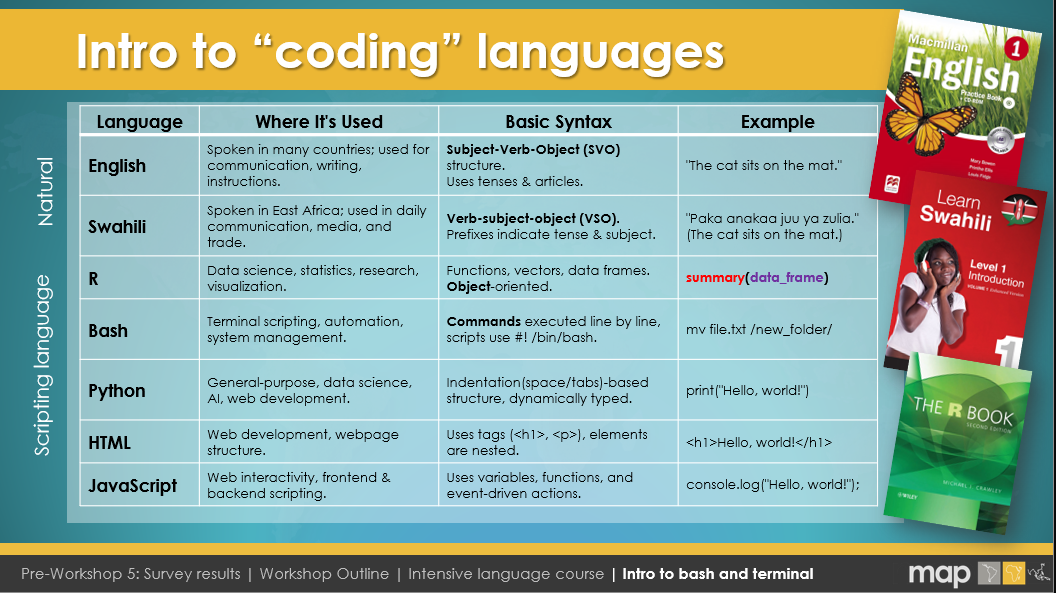
Imagine coding as a global journey, and along the way, you’ll meet some quirky languages. Each one has its own vibe and culture. Whilst you'll probably think that you only need to learn how to use R, this course is designed to give you the confidence to also jump onto other languages without fear (or more like: excitement!). So, whilst learning R is a priority to get you coding and plotting (figures and your research), know that there are other languages out there too.
- R: R is like that friend who shows up to a party with all the charts, graphs, and stats. If you love data, R loves you back. It’s great for crunching numbers and turning data into colorful visuals—perfect for impressing your friends (or your boss).
- Git Bash: Think of Git Bash as the trusty sidekick that helps you keep track of every change you make in your code. It's like the Robin to your coding Batman, helping you avoid accidental disaster (“Oops, I deleted all my code!”) by saving versions of your work.
- Command Prompt (Windows): The Command Prompt is the grandparent of coding languages. Simple, no-nonsense, and loves tradition. It’s here to help you run programs, move files, and feel like a true hacker from a 90s movie.
- Linux/Ubuntu Terminal: If Command Prompt is a grandparent, the Linux Terminal is its cool, tech-savvy cousin who is always up for customization. It's perfect for power users who like to take control of everything on their machine—if you learn this, you’re leveling up!
- HTML: HTML is like the friendly neighbor who helps build websites. It’s not too fancy, but you can still do a lot with it. Need to create a website? HTML is your go-to for making sure things look neat and organized.
Don’t Panic!
Now, I know coding can sound a bit intimidating at first. You might think you're going to be staring at a screen of endless gibberish. But here’s the secret: every coder felt that way at first. Coding is just giving instructions, one step at a time. And trust me, your computer really wants to listen. It’s like a very obedient puppy—sometimes it gets confused and crashes, but it’s always trying its best.
Embrace the Errors
Coding is basically typing stuff and seeing if it works. Spoiler: it won't work the first time. But that’s part of the fun! Every error message is just your computer’s way of saying, “Hey, I don’t understand what you want. Can you explain it better?” So, embrace the typos and bugs—they’re your guides to mastery. (Just please do not break this website when publishing your assignments as JK is definitely not a Master - yet.)
Basic Coding Syntax in Different Languages
Whether you’re crunching data, automating tasks, or building a website, most programming languages have similar building blocks. Let’s break down some basic syntax:
Commands
Commands are the instructions you give to a computer. They tell the machine what to do, like printing text, loading data, or performing calculations.
- R:
print("Hello, world!")– This command prints "Hello, world!" to the console. - Git Bash:
git push origin main– This command pushes your local code changes to the main branch on a remote Git repository. - Command Prompt:
dir– Lists all the files and directories in the current folder. - Linux Terminal:
ls– Similar to Command Prompt’s `dir`, this lists all files and directories in a folder. - HTML:
<p>Hello, world!</p>– This command creates a paragraph element that displays "Hello, world!" on a webpage.
Assigning Values
Assigning values is how you store information in a variable, which can then be used later in your code. You can think of variables like labeled boxes that hold data.
- R:
my_data <- c(1, 2, 3, 4, 5)– This assigns a vector of numbers to the variablemy_data. - Git Bash:
USERNAME="JohnDoe"– Assigning a value to an environment variable in a Git Bash script. - Command Prompt:
set NAME=John– Creates a variable calledNAMEwith the valueJohn. - Linux Terminal:
my_var="Hello"– Assigns the string "Hello" to a variable calledmy_var. - HTML: HTML doesn’t assign variables in the traditional sense, but you can use JavaScript within HTML to assign values. For example,
<script>var name = "John";</script>.
Formulas (or Operations)
Formulas (or operations) perform calculations or manipulate data. It could be simple math, string manipulation, or more complex functions depending on the language.
- R:
sum(c(1, 2, 3))– This sums up the numbers 1, 2, and 3 and returns the result. - Git Bash: In Git Bash, we don’t usually perform calculations, but you can run shell scripts that include arithmetic:
echo $((3 + 4))– This outputs the result of 3 + 4. - Command Prompt:
set /a sum=5+10– This adds 5 and 10 and stores the result in a variablesum. - Linux Terminal: Similar to Git Bash:
echo $((2 * 8))– Multiplies 2 by 8 and prints the result. - HTML: HTML itself doesn’t have formulas, but you can use JavaScript within HTML to perform calculations. For example,
<script>var result = 5 + 3;</script>.
Writing Notes (Comments)
Comments are notes in your code to explain what’s happening. They’re super useful for reminding yourself what you were doing, or explaining your code to someone else. Comments are ignored by the computer when running the code.
- R:
# This is a comment in R– Everything after the#symbol is ignored by R. - Git Bash:
# This is a comment in Git Bash– Just like in R, the#symbol is used for comments. - Command Prompt:
REM This is a comment in Command Prompt– TheREMkeyword is used for comments in batch scripts. - Linux Terminal:
# This is a comment in Linux– Like in Git Bash,#is used for comments. - HTML:
<!-- This is a comment in HTML -->– HTML comments are written between<!--and-->.
With these basic building blocks, you're on your way to understanding how to interact with different coding languages. Every language has its own quirks, but the underlying logic is the same: give clear instructions, store and manipulate data, and document your work!
Introduction to Bash and Git in RStudio
Welcome to your guide on using Bash and Git within RStudio! In this section, we’ll explore how to run Bash commands using RStudio’s integrated Terminal and how to set up Git for version control—linking your work to GitHub for seamless collaboration.
1. Getting Started with Bash in RStudio
Bash (Bourne Again Shell) is a powerful command-line interface that lets you interact directly with your computer’s operating system. RStudio’s Terminal (found under Tools > Terminal > New Terminal) is your gateway to running Bash commands, managing files, and automating tasks.
💡 Think of the RStudio Terminal as a "secret door" in RStudio that lets you talk directly to your computer, just like the Command Prompt on Windows or the Terminal on macOS/Linux.
Basic Bash Command Structure:
command [options] [arguments]
- Example:
mv -v ~/data_backup /mnt/backup/– Moves yourdata_backupfolder to a new destination with verbose output. - Example:
Rscript analysis.R– Runs an R script directly from the terminal. - Example:
free -h– Displays system memory usage in a human-readable format.
Use the Terminal in RStudio like you would a traditional Command Prompt or macOS/Linux Terminal—it's your secret door to a world of efficient coding!
Understanding the Difference: Git vs. GitHub
Although people often say “Git” and “GitHub” in the same breath, they are not the same thing:
- Git: A free and open-source distributed version control system. It runs locally on your computer, tracking changes to your project files over time. With Git, you can commit changes, revert to earlier versions, create branches for new features, and merge updates without losing work.
- GitHub: A web-based platform (a hosting service for Git repositories) that also provides collaborative features such as pull requests, issue tracking, code review, and wikis. Think of GitHub as a “cloud-based home” for your Git repositories, where you can share code with others, contribute to open-source projects, and manage teamwork more effectively.
In other words, Git is the tool that handles version control on your computer, while GitHub is the service that allows you to upload (push) your local Git repositories and collaborate with others online. You can use Git without GitHub (e.g., on your own server or locally), but GitHub’s social coding features make it easy to share, review, and collaborate on projects with people around the world.
2. Setting Up Git in RStudio
Git is a distributed version control system that allows you to track changes in your code over time. It provides a safety net by letting you revert to earlier versions, experiment on separate branches, and merge changes when ready. This is crucial for collaborative projects and for maintaining a clear history of your work.
Configure Git using the RStudio Terminal:
git config --global user.name "Your Name"git config --global user.email "your.email@example.com"git config --global credential.helper 'cache --timeout=7200'-
git config --global→ Sets the configuration for all repositories on your system. -
user.name→ Your GitHub username (visible in commits). -
user.email→ Your registered email address on GitHub.
Verify your Git installation by running:
git --version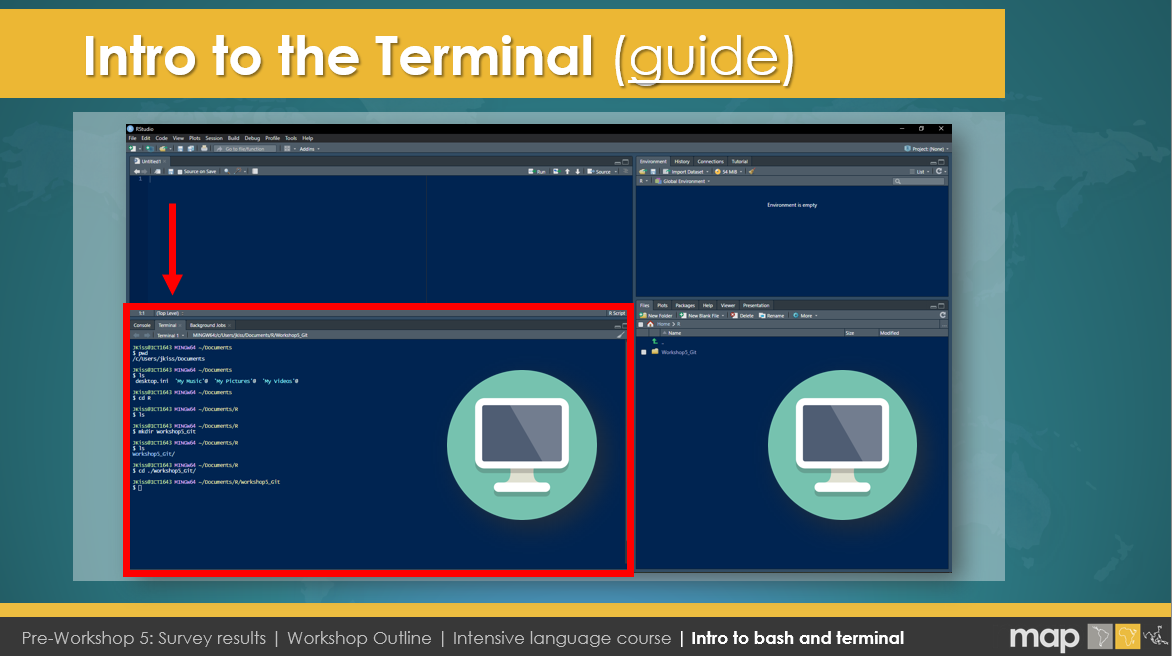
Verifying Your Terminal Settings in RStudio
Before running Bash commands or configuring Git, make sure RStudio’s Terminal is set up correctly and Git software is installed on your computer! Follow these steps:
-
Open RStudio’s Global Options:
- Go to Tools > Global Options.
- In the left-hand menu, select Terminal.
-
Choose Your Default Shell:
- Under New terminals open with:, pick the appropriate shell for your system (e.g., Git Bash on Windows, /bin/bash on macOS/Linux).
- If you have multiple shells installed, confirm you’re selecting the one you use for Git or other command-line tasks.
-
Check the “Close terminal when RStudio exits” Option:
- Under Miscellaneous, you can enable or disable “Close terminal when RStudio exits”. If you prefer the terminal session to remain open between sessions, leave this unchecked.
-
Apply and Save:
- Click Apply and then OK to save your changes.
- Open a new terminal via Tools > Terminal > New Terminal to confirm the shell is correct.
Ensuring these settings are correct helps avoid confusion when running Bash commands, configuring Git, or using other command-line tools within RStudio.
Setting Up SSH Keys in RStudio for GitHub
Instead of using a personal access token (PAT) or HTTPS to authenticate with GitHub, you can configure RStudio to use SSH keys for a secure, password-free connection. Here’s how:
-
Generate an SSH Key in RStudio:
- Open RStudio, then go to Tools > Global Options > Git/SVN (or just Git in newer versions).
- Look for a button or link that says Create RSA Key or Create SSH Key. Click it to generate a new key pair.
- RStudio will store the private key locally (e.g.,
~/.ssh/id_rsaon Linux/Mac orC:\Users\YourName\.ssh\id_rsaon Windows). The public key isid_rsa.pub.
-
Add Your Public Key to GitHub:
- Copy the contents of
id_rsa.pub(the public key). - On GitHub, go to Settings > SSH and GPG keys > New SSH key.
- Give it a title (e.g., “RStudio SSH Key”), paste the public key, and click Add SSH key.
- Copy the contents of
-
Test the Connection:
- In RStudio’s Terminal or your system’s terminal, run
ssh -T git@github.com. - If you see a success message like “Hi username! You've successfully authenticated,” you’re all set.
- In RStudio’s Terminal or your system’s terminal, run
From now on, you can clone, pull, and push via SSH without re-entering your password or PAT.
For example, an SSH clone URL looks like:
git@github.com:YourUsername/YourRepo.git.
Task: Basic Bash Commands
Let’s practice a few essential Bash commands for navigating directories, creating new folders, and removing them.
- Explore Your Current Working Directory
pwd– Prints the path of your current working directory.ls– Lists the files and folders in your current directory.cd– Changes your directory (e.g.,cd Documents). Usecd ..to go up one level.- Create a Folder for Today’s Session
mkdir workshop5_Git– Makes a new folder namedworkshop5_Git.ls– Check to see that the new folder was created.cd workshop5_Git– Optionally navigate inside the folder.- Remove the Folder
rm -r workshop5_Git– Removes the folder and everything inside it (be careful!).ls– Verify the folder no longer exists.This quick exercise helps you become more comfortable with basic Bash commands and navigating the file system.
3. Why Use Git and GitHub?
While Git is the tool you use locally to track your project’s history and manage changes, GitHub is an online platform that hosts your Git repositories. Here’s why both are important:
- Git: Provides a robust mechanism for version control on your computer. It helps you maintain a detailed record of changes, revert to previous states, and experiment with new ideas using branching—all without losing your work.
- GitHub: Acts as a remote backup and collaboration hub. It allows you to share your code, collaborate with peers, review changes through pull requests, and manage issues—all in one central place.
- Difference: Think of Git as the engine running locally to manage your code history, while GitHub is the cloud service that makes your work accessible and shareable. Together, they create a powerful workflow that enhances productivity and fosters collaboration.
4. Linking a GitHub Repository to Your RStudio Project
After configuring Git, you can create a repository on GitHub and connect it to a new RStudio project:
- Create a Repository on GitHub: Log in to GitHub and set up a new repository with a meaningful name. Decide whether it should be public or private.
- Create a New Project in RStudio: Go to File > New Project > Version Control > Git and paste the GitHub repository URL. RStudio will clone the repository and set up the project.
-
Manage Your Work: As you develop your project, use Git commands or the
RStudio Git pane to save your progress:
git add .
git commit -m "Describe your changes"
git push origin main
5. Understanding the Git Workflow
Git is a distributed version control system that allows you to track and manage changes to your codebase over time. Below is a quick overview of the main concepts and commands you’ll use in a typical Git workflow:
- Branch: A separate line of development in your project. Branches let you experiment or add features without affecting the main code.
-
git checkout [branch-name]: Switches to an existing branch,
or you can create a new one with
git checkout -b new-branch. - git add [file(s)]: Stages your modified files, telling Git which changes you want to include in the next commit.
- git commit -m "[message]": Creates a snapshot of your staged changes. Always include a meaningful message to describe what you did.
- git push origin [branch-name]: Uploads local commits to the remote repository, making your changes visible to collaborators on GitHub (or another Git host).
- git pull origin [branch-name]: Fetches and merges changes from the remote repository, ensuring your local branch is up to date with the latest commits.
-
git merge [branch-name]: Integrates changes from one branch into another.
Often used to merge a feature branch into
mainwhen it’s ready. - git clone [URL]: Creates a local copy of a remote repository on your machine, including its entire commit history and branches.
Understanding these commands and concepts is key to maintaining a clean, well-organized project history and collaborating effectively. By committing regularly, branching for new features, and pushing/pulling updates, your team can work in parallel without overwriting each other’s changes.
Quick Recap
| Command | Description |
|---|---|
| git status | Check repo status |
| git add . | Stage all changes |
| git commit -m "message" | Commit changes |
| git push origin main | Push to GitHub |
| git pull origin main | Pull latest updates |
| git checkout -b new-branch | Create & switch to a new branch |
| git merge branch-name | Merge branches |
| git clone URL | Clone a repository |
Task: Creating a New GitHub Repo (with a README) and Connecting to RStudio
If you want to start a fresh project on GitHub and immediately connect it to RStudio, follow these steps:
- Create a New Repository on GitHub:
- Click the + New repository button (top-right corner) or go to your profile > Repositories > New.
- Give your repository a name and decide if it’s Public or Private.
- Check the box “Initialize this repository with a README”. This adds a basic README file right away.
- Click Create repository.
- Clone the Repo in RStudio:
- On the main page of your new repository, click the green Code button and copy the clone URL (HTTPS or SSH).
- In RStudio, go to File > New Project > Version Control > Git.
- Paste the repository URL, choose a local folder, and click Create Project.
- Commit and Push Changes:
- Open the new project in RStudio, edit the README or add new files.
- Use the Git pane (or terminal) to stage (
git add .), commit (git commit -m "message"), and push (git push origin main) your changes to GitHub.That’s it! You now have a local RStudio project connected to a GitHub repo initialized with a README. This is a quick way to start version control from day one.
Task: Create a New GitHub Repo, Upload Data & R Script, and Push Changes from RStudio
In this exercise, you’ll walk through the process of creating a new GitHub repository, uploading your data and an R script, then making changes (e.g., adding a simple plot) and pushing everything to GitHub using RStudio’s built-in Git GUI.
- Create a New GitHub Repository:
- Log in to GitHub and click + New repository (top-right) or Repositories > New on your profile.
- Give the repository a name (e.g.,
routine_data_analysis) and optionally include a description.- Check “Initialize this repository with a README” to create a basic README file. Then click Create repository.
- Clone the Repo in RStudio:
- In RStudio, go to File > New Project > Version Control > Git.
- Copy the repository’s SSH or HTTPS URL from GitHub (e.g.,
git@github.com:YourUser/routine_data_analysis.git).- Paste the URL into RStudio, choose a local folder, and click Create Project.
- Upload Data and R Script:
- Place your data file (e.g.,
routine_data.csv) into the newly created project folder.- Create a new R script (e.g.,
data_cleaning.R) in RStudio. Write code to load and clean the data, for example:my_data <- read.csv("routine_data.csv") # Perform cleaning steps, e.g.: # my_data <- my_data %>% # filter(!is.na(variable)) %>% # mutate(...)- Add a Basic Plot:
- In the same
data_cleaning.Rscript, create a simple plot of your cleaned data, for instance:plot(my_data$variable1, my_data$variable2, main = "Basic Plot of Routine Data", xlab = "Variable 1", ylab = "Variable 2")- Stage, Commit, and Push via RStudio’s Git GUI:
- Open the Git pane (usually in the top-right or top-left pane in RStudio). You should see the files you added or changed (e.g.,
routine_data.csvanddata_cleaning.R).- Select the checkboxes next to each file to stage them. Click Commit to open the commit window.
- Write a clear commit message (e.g., “Added routine_data.csv and data_cleaning.R script”).
- Click Commit to finalize. Then click the Push button to upload your changes to GitHub.
Once complete, check your repository on GitHub to ensure your data file, R script, and commit history are visible. Congratulations—you’ve successfully created a new repo, added data, made changes, and pushed them using the Git GUI in RStudio!
Task: Forking a Public Repo and Uploading to
06_Assignments/Git_IntroSuppose you want to contribute to the public repository at https://github.com/JuniperPNG/MAP_training . You can do so by forking the repo, making changes, and submitting a pull request. Here’s the typical workflow:
- Fork the Repo on GitHub:
- Visit the MAP_training repository .
- Click the Fork button (top-right). This creates a copy under your GitHub account, e.g.
github.com/YourUsername/MAP_training.- Clone Your Fork Locally:
- In RStudio, go to File > New Project > Version Control > Git.
- Use the SSH or HTTPS clone URL from your fork, e.g.
git@github.com:YourUsername/MAP_training.git.- Select a local directory to store the project.
- Upload Your Assignment:
- Inside RStudio, open the cloned project folder. Navigate to
06_Assignments/Git_Intro.- Add or modify any files (e.g.,
my_solution.R) in that folder.- Commit and push changes to your fork (e.g.,
git push origin main).- Open a Pull Request (PR):
- Back on GitHub, go to your fork at
github.com/YourUsername/MAP_training.- Click Contribute > Open pull request to propose merging your changes into
JuniperPNG/MAP_training.- Add a descriptive title/summary. Once merged, your changes become part of the main repo.
This “fork and pull request” workflow is common in open-source projects. It lets you propose changes without directly altering someone else’s code. Once your pull request is reviewed and merged, your contributions appear in the original repository.
Task: Download & Use GitHub Desktop
GitHub Desktop is a user-friendly application that helps you manage your Git repositories without using the command line. It provides a visual interface for cloning repos, committing changes, and pushing updates to GitHub.
- Download & Install GitHub Desktop:
- Visit https://desktop.github.com to download the installer for your operating system (Windows or macOS).
- Run the installer and follow the on-screen instructions.
- Sign In to GitHub:
- Launch GitHub Desktop, then sign in with your GitHub account credentials.
- If you use two-factor authentication, have your code ready.
- Clone a Repository:
- Click File > Clone repository... (or use the “Clone a repository from the Internet...” prompt).
- Select a repo from your GitHub account or paste a repo URL. Choose a local path and click Clone.
- Make Changes & Commit:
- Open the cloned folder in your favorite editor (or directly in GitHub Desktop if you prefer). Make any necessary changes to files.
- Back in GitHub Desktop, review your changes under the “Changes” tab.
- Write a commit summary and optional description, then click Commit to [branch].
- Push Your Changes:
- Click the Push origin button (top-right) to upload your commits to GitHub.
- If you have a new branch, GitHub Desktop may prompt you to “Publish branch.” This makes your branch visible on GitHub.
- Create or Merge a Pull Request (Optional):
- If you’re collaborating or want a code review, open GitHub Desktop’s Branch > Create Pull Request (or visit the repo on GitHub) to merge changes into
main.With GitHub Desktop, you can handle the same tasks you would in the terminal (committing, branching, merging) but through a point-and-click interface. It’s especially handy for newcomers to Git or anyone who prefers a visual approach.
7. Collaborating with GitHub
GitHub makes collaboration straightforward:
- Share Your Repository: Invite collaborators via your repository’s settings on GitHub, allowing multiple team members to work on the project simultaneously.
- Synchronize Changes: Regularly pull updates using
git pull origin mainto ensure you’re working with the latest version. - Branching and Merging: Create branches with
git checkout -b new-branchto work on features independently and merge them back when complete usinggit merge branch-name.
With Git and GitHub, you not only safeguard your code but also streamline collaboration, making it easier to manage contributions from multiple developers.
8. Next Steps
Practice these commands in your RStudio Terminal and explore the Git pane to familiarize yourself with version control. Although another session will dive deeper into Git, this guide provides a solid starting point for managing your code and collaborating on GitHub.
Happy coding!
Additional Resources
Here are some helpful links and tutorials to further sharpen your skills:
- Codecademy: Learn the Command Line – A beginner-friendly interactive course on Bash/command line basics.
- Codecademy: HTML & CSS – Build or strengthen your web fundamentals, including basic HTML/CSS.
- Coursera: Introduction to Git and GitHub – A structured course covering the essentials of Git and GitHub.
- RStudio Git/GitHub Cheat Sheet – Handy quick-reference guide for Git commands and GitHub workflow in RStudio.
- R for Data Science: Data Visualization – An excellent, in-depth resource for learning ggplot2 and best practices in R.
- Pro Git Book (Free) – A comprehensive resource for everything Git, from beginner to advanced topics.
Whether you’re diving deeper into the command line, honing your HTML/CSS skills, or mastering GitHub, these resources will help you along the way!