![]()
MAP Dar Node ECR Development Program
Welcome to MAP Dar es Salaam Node ECR Development program for Cohort 1 (2025). This pilot program is designed to build the research capacity of emerging researchers across Africa. It targets early career researchers (ECRs), equipping them with essential skills in data management, coding, spatial analysis, communication, and leadership. It is an opportunity to shine!
This program builds on the previous MAP's Introduction of Spatial Analysis for Infectious Diseases tutorial material.
The program is structured around fortnightly workshops, complemented by self-guided learning, hands-on assignments, and a mentorship scheme. The training program consists of a "Data and coding" section as well as a "Community and leadership building" component. As part of the program, the participants will be sharing their assignments (e.g., informational interviews, R scripts) on this page via GitHub.
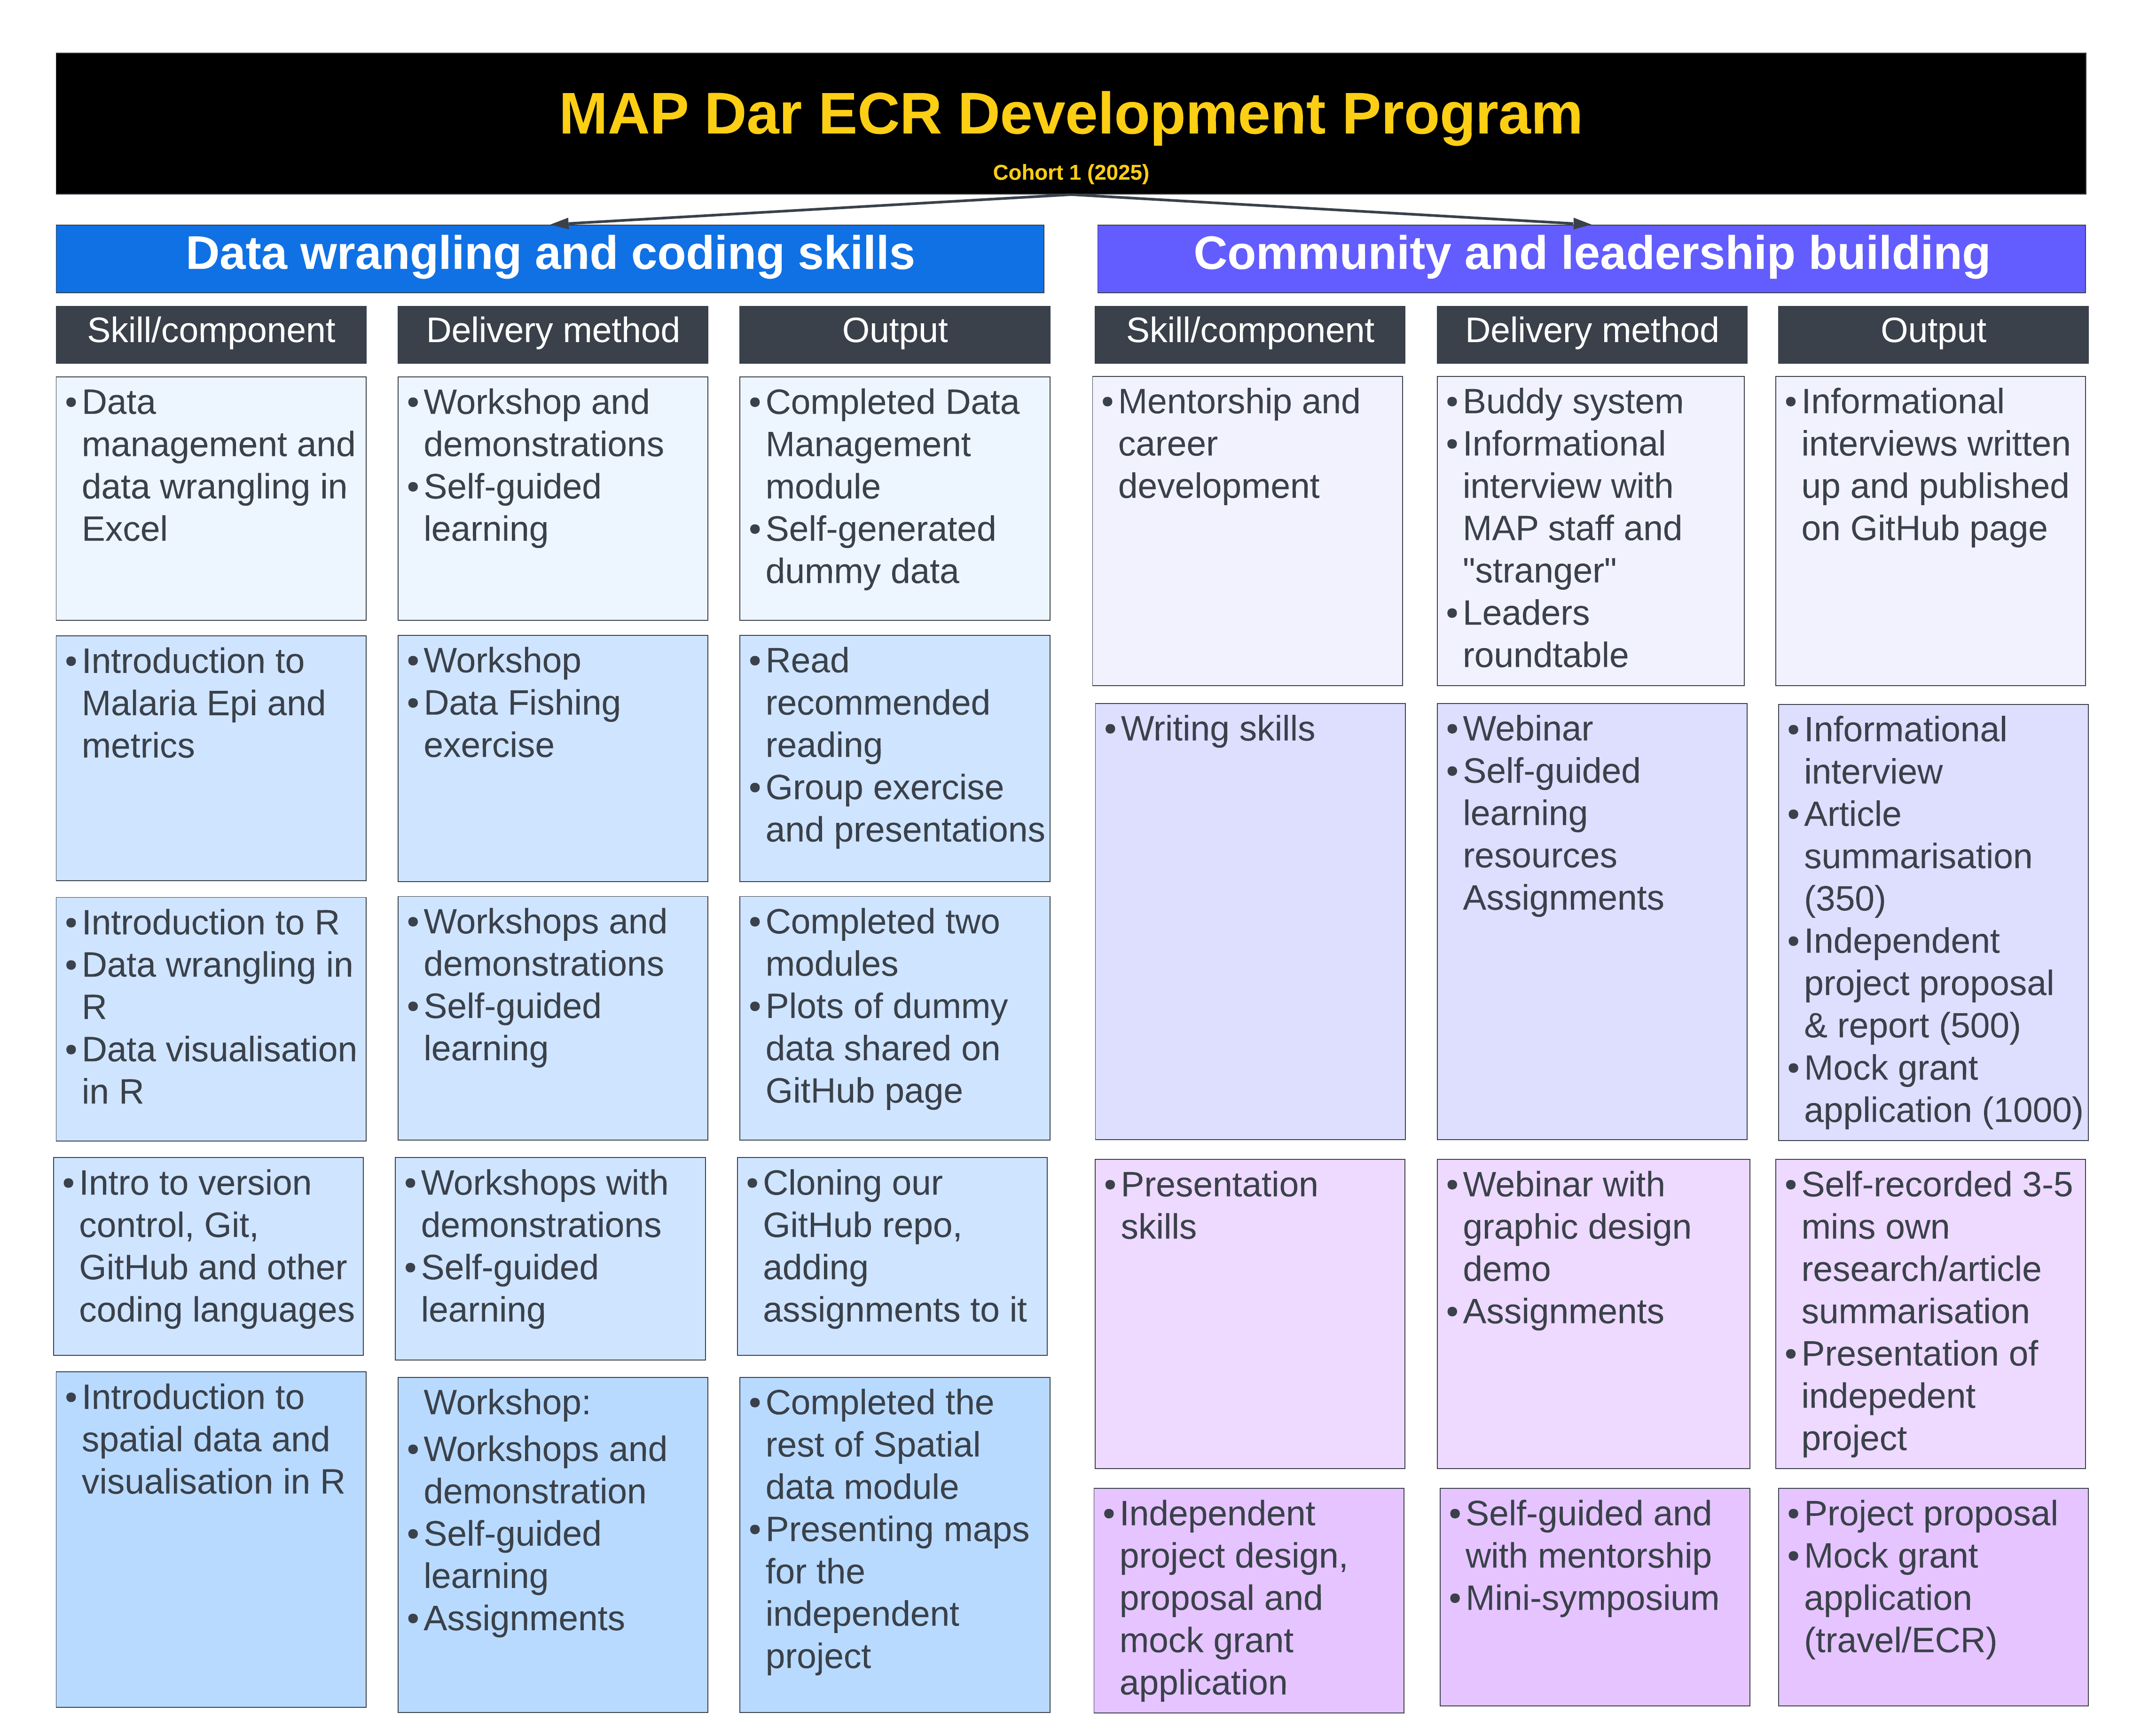
First Series of Workshops (Subject to Change)
- Webinar 1 (13 Jan 2025): Welcome to the MAP Dar ECR Training and Mentorship Program!, 10 am EAT, 1-hour session
- Workshop 1 (20 Jan 2025): Introduction to Data Management and Wrangling, 10 am EAT, 2-hour session
- Workshop 2 (27 Jan 2025): Introduction to Malaria Epi, 10 am EAT, 2-hour session
- Data Club (3 Feb 2025): Tanzania and Zambia malaria data fishing exercise, 10 am EAT, 1.5-hour session
- Workshop 3 (10 Feb 2025): Intro to R and Version control (Git), 10 am EAT, 2-hour session
- Workshop 4 (17 Feb 2025): Data wrangling in R, 10 am EAT, 2-hour session
- Workshop 5 (24 Feb 2025): GitHub repositories and R, 10 am EAT, 2-hour session
- Workshop 6 (3 Mar 2025): Data Visualisation in R, 10 am EAT, 2-hour session
- Workshop 7 (10 Mar 2025): Communication: Writing and Presenting, 10 am EAT, 2-hour session
- Workshop 8 (17 Mar 2025): Intro to Spatial Data in R
- Workshop 9 (24 Mar 2025): Intro to Rmarkdown, Assignment Publishing onto GitHub, and Independent Team Projects, 10 am EAT, 2-hour session
- Workshop 10 (31 Mar 2025): Intro to QGIS, 10 am EAT, 2-hour session
- Workshop 11 (7/14 April 2025): Intro to Spatial Modelling and INLA,
- Subsequent workshops (e.g., advanced modelling) will be tailored to the cohort, ending the program with a symposium in July 2025.
The aim of the workshops is to teach basic concepts, skills and tools for working with data so that you can get more done in less time, and with less pain. The lessons here focus mainly on the use of R and GitHub.
The main sections of this course are designed to be introductory
for participants with little to no programming experience. The advanced
section taught in R for Geostatistical Modelling usingR-INLA requires participants to have some statistical
knowledge, some understanding of Bayesian statistics and some prior
knowledge of spatial data.
Meet the Team
The team behind this program consists of malaria researchers from MAP Dar, MAP Perth, Vector Atlas, and Ifakara Health Institute. We are very excited to release future workshops, tutorials, and enroll more ECR participants that could be more tailored to regional/country requests. Please get in touch with us on our Google Group or directly with Juniper (Cohort Coordinator, juniper.kiss@thekids.org.au).

Download the data
All data for this workshop can be found in a GoogleDrive folder.
About the data
For the purpose of this work we are using routine data from the DHIS2 processed by WHO for the country of Fakeland. Fakeland is a malaria endemic country in sub-Saharan Africa, with an ever improving health system. Despite heavy investment and continual deployment of interventions such as mass campaigns for net, improved case-management - Fakeland still is considered a high burden country with the entire population of 11.3 million people continually at risk for malaria. The main mosquito across the country is Anopheles gambiae s.s., and transmission shows a uni-model seasonal profile with the peaks near the end of the year. The OPD reporting into DHIS2 happened across the 100 health facilities in the country. Data from Community Health Workers (CHWs) are also collated at health facilities. We are provided data disaggregated by age and diagnostic test for our analysis.
Notes during the workshops
We have set up a Googledoc where we will put all the R scripts and notes we make during the workshop
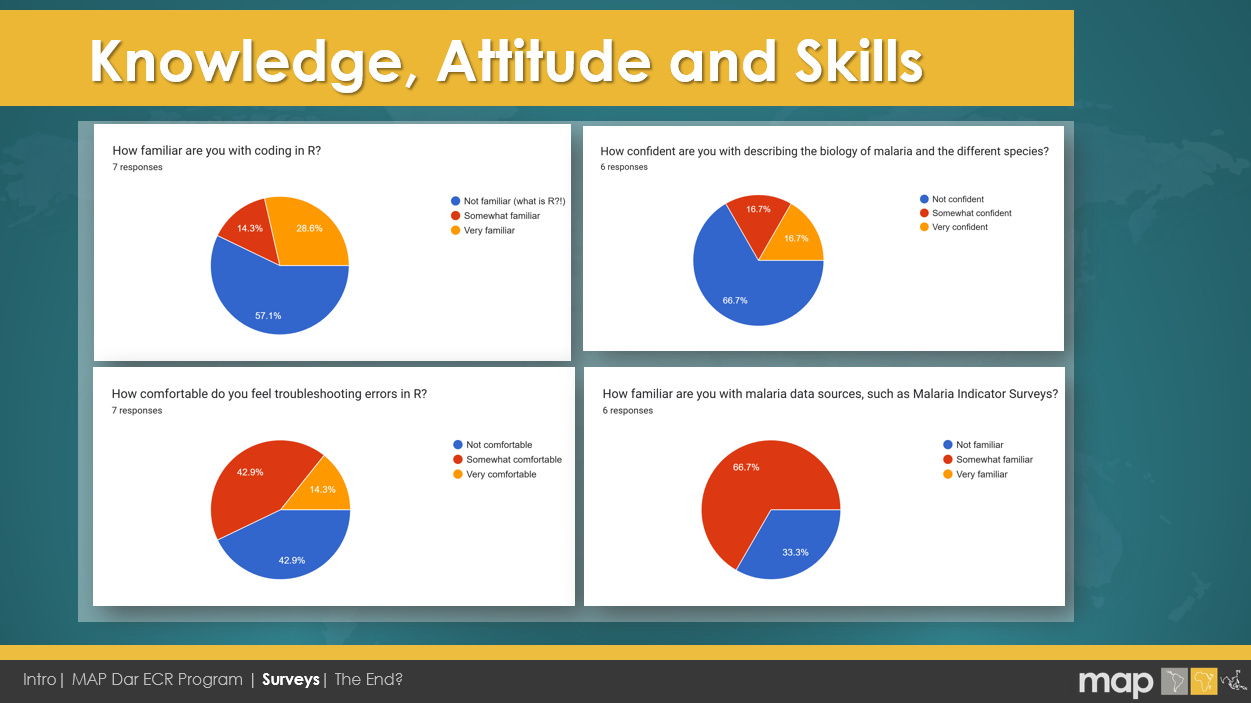
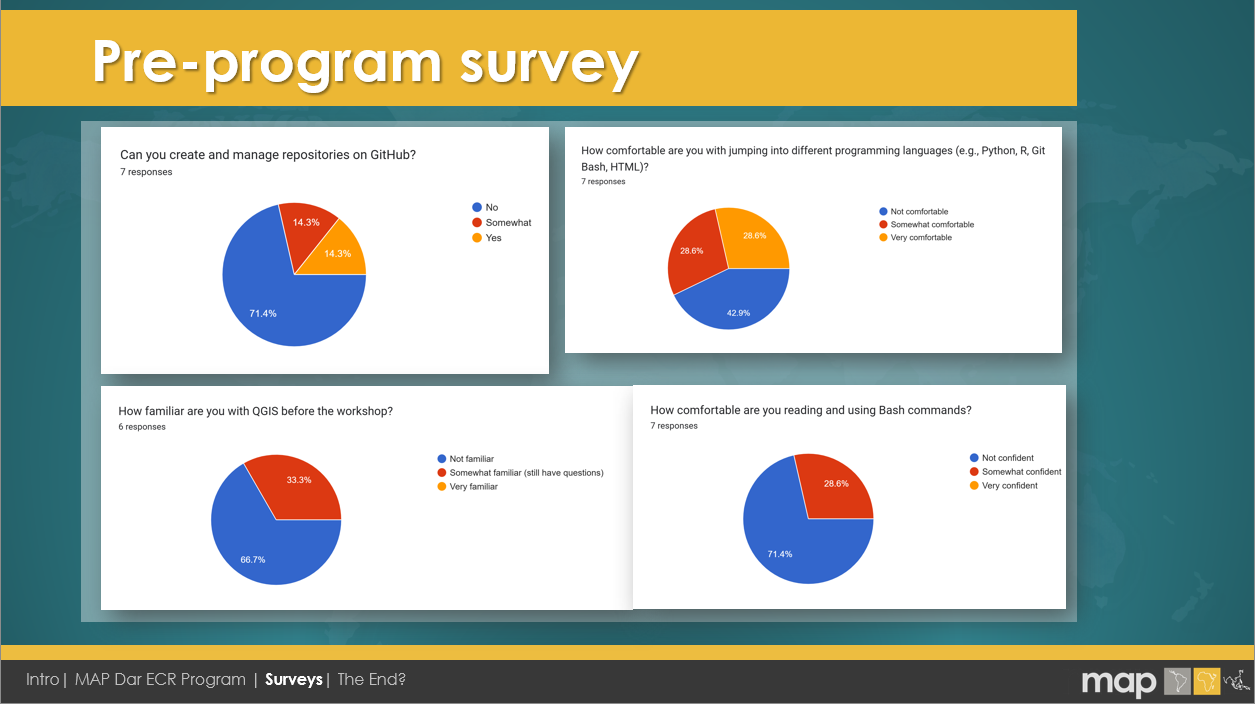
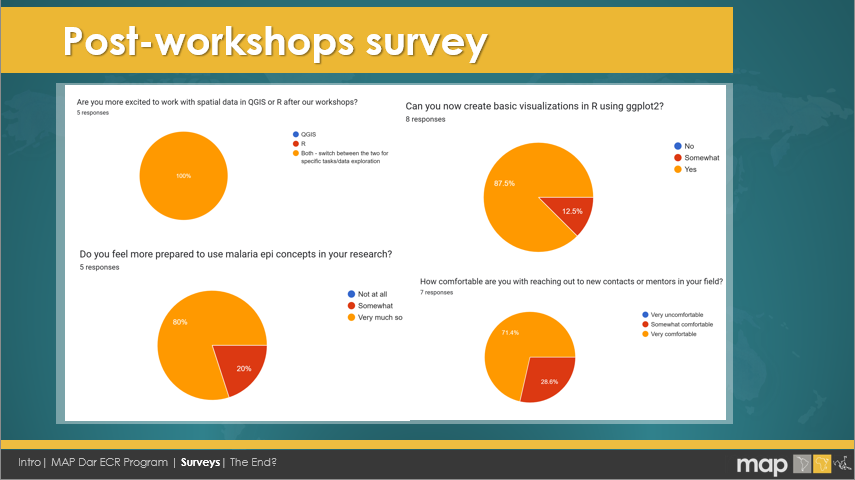
KAS Surveys
Before and during the program, we tracked our participants' Knowledge, Atittude and Skills so we could make sure we are delivering an impactful, responsive program. Session leaders and facilitators met every week to review the survey results, and adjust together the next session's materials. After every workshop, we assessed if the KAS has indeed improved for the participants. Here are w few snippets of before-after workshop results:

Installations
To avoid troubleshooting during the lesson, participants should follow the instructions below to download and install everything beforehand. If you are using your own computers this should be no problem, but if the computer is managed by your organization’s IT department you might need help from an IT administrator.
Overview of Software
This workshop will require you to install several software programs that are essential for data analysis, programming, and project management. Below is a brief description of each software and its purpose:
- R: A powerful programming language and software environment specifically designed for statistical computing and data analysis. It offers a wide array of packages for data manipulation, statistical modeling, and visualization.
- RStudio (now known as Posit): An integrated development environment (IDE) for R that makes coding easier and more efficient. It provides a user-friendly interface for writing and executing R scripts, managing projects, and visualizing data.
- QGIS: A free and open-source geographic information system (GIS) that enables users to create, edit, visualize, and analyze geospatial data. It is particularly useful for mapping and spatial data analysis.
- Visual Studio Code (VS Code): A lightweight yet powerful source code editor that supports numerous programming languages. It offers features like debugging, task running, and version control, making it ideal for coding projects.
- GitHub: A platform for version control and collaboration that allows you to store and manage your code repositories. It facilitates collaboration on projects and keeps track of changes made to your code.
Understanding the role of each software will help you utilize them effectively throughout the workshop. Make sure to follow the installation instructions carefully to ensure everything is set up correctly!
Install R and RStudio
R and RStudio are two separate pieces of software:
- R is a programming language that is especially powerful for data exploration, visualization, and statistical analysis.
- RStudio (renamed recently to Posit) is an integrated development environment (IDE) that makes using R easier. In this course, we use RStudio to interact with R.
If you don’t already have R and RStudio installed, follow the instructions for your operating system below. You have to install R before you install RStudio.
Windows
- Download R from the CRAN website.
- Run the
.exefile that was just downloaded. - Go to the RStudio download page.
- Under All Installers, download the RStudio Installer for Windows.
- Double click the file to install it.
- Once it’s installed, open RStudio to make sure it works and you don’t get any error messages.
MacOS
- Download R from the CRAN website.
- Select the
.pkgfile for the latest R version. - Double click on the downloaded file to install R.
- It is also a good idea to install XQuartz (needed by some packages).
- Go to the RStudio download page.
- Under All Installers, download the RStudio Installer for MacOS.
- Double click the file to install RStudio.
- Once it’s installed, open RStudio to make sure it works and you don’t get any error messages.
Linux
- Follow the instructions for your distribution from CRAN, they provide information to get the most recent version of R for common distributions. For most distributions, you could use your package manager (e.g., for Debian/Ubuntu run
sudo apt-get install r-base, and for Fedorasudo yum install R), but we don’t recommend this approach as the versions provided by this are usually out of date. In any case, make sure you have at least R 3.3.1. - Go to the RStudio download page.
- Under All Installers, select the version that matches your distribution and install it with your preferred method (e.g., with Debian/Ubuntu
sudo dpkg -i rstudio-YYYY.MM.X-ZZZ-amd64.debat the terminal). - Once it’s installed, open RStudio to make sure it works and you don’t get any error messages.
Installing Rtools (Windows)
Rtools is a collection of tools necessary for building R packages from source on Windows. To install Rtools:
- Download Rtools from the Rtools page on CRAN.
- Run the downloaded installer and follow the instructions.
- Ensure that Rtools is added to your system PATH during installation.
- After installation, open R and run the following command to verify Rtools is correctly installed:
Sys.which("make"). It should return the path to the make tool.
Update R and RStudio
If you already have R and RStudio installed, first check if your R version is up to date:
- When you open RStudio your R version will be printed in the console
on the bottom left. Alternatively, you can type
sessionInfo()into the console. If your R version is 4.0.0 or later, you don’t need to update R for this lesson. If your version of R is older than that, download and install the latest version of R from the R project website for Windows, for MacOS, or for Linux - It is not necessary to remove old versions of R from your system, but if you wish to do so you can check How do I uninstall R?
- Note: The changes introduced by new R versions are usually
backwards-compatible. That is, your old code should still work after
updating your R version. However, if breaking changes happen, it is
useful to know that you can have multiple versions of R installed in
parallel and that you can switch between them in RStudio by going to
Tools > Global Options > General > Basic. - After installing a new version of R, you will have to reinstall all
your packages with the new version. For Windows, there is a package
called
installrthat can help you with upgrading your R version and migrate your package library.
To update RStudio to the latest version, open RStudio and click onHelp > Check for Updates. If a new version is available
follow the instruction on screen. By default, RStudio will also
automatically notify you of new versions every once in a while.
Install required R packages
During the course we will need a number of R packages. Packages
contain useful R code written by other people. We will use the packagestidyverse, sf and terra mainly
for this workshop.
To try to install these packages, open RStudio. If this is your first
time opening it you may be prompted to set a CRAN mirror - select any
country or even the R global cran. This step is important because CRAN
aka Comprehensive R Archive Network is where R stores many
useful packages that we may use. If you forgot to set this up or wish to
change yours you can go to Tools ->Global Options -> Packages, you will have a
screen that looks like this:
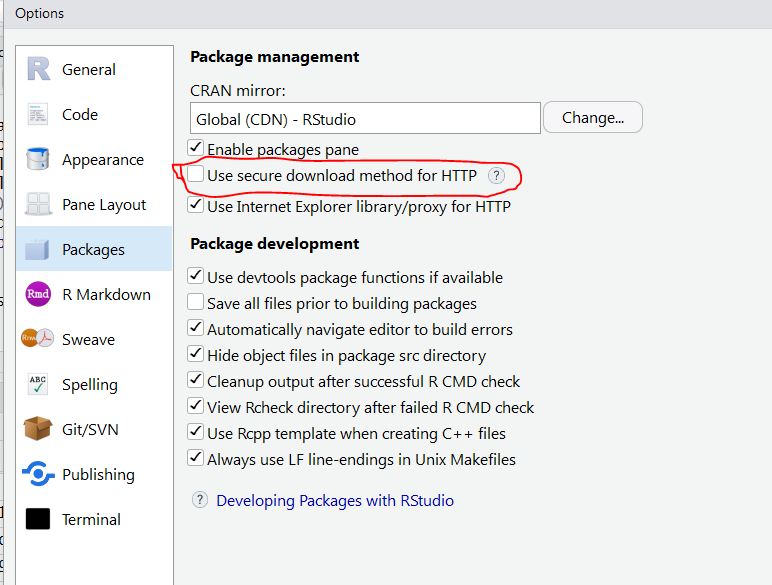
You can change CRAN by clicking the change... button.
Additionally, make sure that the section circled in red in the image
above is not selected
Next, copy and paste the following command into the console window (look for a blinking cursor on the bottom left), then press theEnter (Windows and Linux) or Return (MacOS) to execute the command.
list.of.packages <- c("tidyverse", "sf", "terra", "sp", "raster", "scico", "RColorBrewer", "viridis", "viridisLite", "ggplot2", "tidyr", "dplyr", "readxl")
new.packages <- list.of.packages[!(list.of.packages %in% installed.packages()[,"Package"])]
if(length(new.packages)) install.packages(new.packages)
Alternatively, you can install the packages using RStudio’s graphical
user interface by going to Tools > Install Packages and
typing the names of the packages separated by a comma.
R tries to download and install the packages on your machine. Tidyverse is a group of packages so it can take some time to load. When the installation has finished, you can try to load the packages by pasting the following code into the console:
library(tidyverse)
library(sf)
library(terra)
#library(rgdal)
If you do not see an error likethere is no package called ‘...’ you are good to go!
Note: The rgdal package was retired in 2023 and other, older R packages might be dependants of this package. For now, we are going to shift to other packages but if you ever really need to use this package, install earlier version of R.
Also note that when you load a package like tidyverse in for the first time you may see such test in your console:
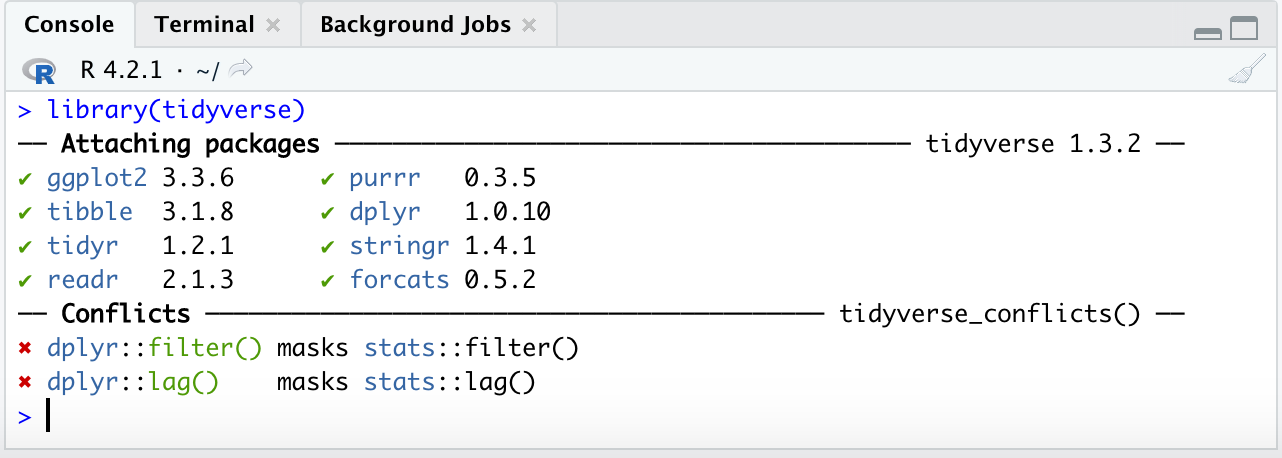
This text is simply telling you what packages have loaded under tidyverse and also telling you that there were function in base R that had the same names as those in tidyverse and they have been ‘over-written’ by the tidyverse ones. Additionally some of you may see some warning signs:
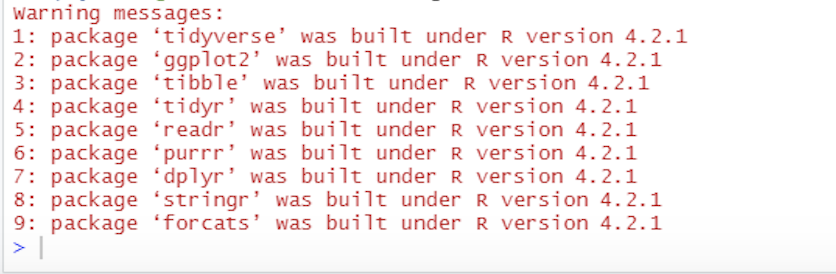
Warnings are normally ok to ignore. Usually when you see
a warning in R, it will still process the command you’ve entered, and
just wants to draw your attention that later on you may have issues
because of the text in the warning. Please ignore any warnings you may
see.
Updating R Packages
Generally, it is recommended to keep your R version and all packages up to date, because new versions bring improvements and important bug fixes. To update the packages that you have installed, click Update in the Packages tab in the bottom right panel of RStudio, or go to Tools > Check for Package Updates....
Sometimes, package updates introduce changes that break your old code, which can be very frustrating. To avoid this problem, you can use a package called renv. It locks the package versions you have used for a given project and makes it straightforward to reinstall those exact package versions in a new environment, for example, after updating your R version or on another computer. However, the details are outside the scope of this lesson.
Installing Visual Studio Code
Visual Studio Code (VS Code) is a powerful code editor that supports various programming languages and comes with numerous extensions to enhance your coding experience.
To install VS Code, follow the instructions below for your operating system:
Windows
- Visit the Visual Studio Code download page.
- Download the installer for Windows.
- Once the download is complete, double-click the installer file to start the installation process.
- Follow the installation prompts, ensuring to select any additional components you wish to include.
- After installation, launch VS Code from the Start Menu or desktop shortcut.
macOS
- Visit the Visual Studio Code download page.
- Download the installer for macOS.
- Open the downloaded .zip file and drag the Visual Studio Code app into your Applications folder.
- Launch VS Code from your Applications folder or the Launchpad.
Linux
- Visit the Visual Studio Code download page.
- Select the appropriate package for your Linux distribution (deb or rpm).
- Install the downloaded package using your package manager. For example, use the following command for .deb files:
- After installation, launch VS Code from your application menu.
sudo dpkg -i .deb Once installed, you can customize VS Code with various extensions and settings to suit your programming needs.
Installing and Configuring Git
Follow these steps to install Git on your computer, so you can start using it for version control and collaboration on GitHub.
Download Git
- Go to the official Git website: https://git-scm.com/downloads
- Select your operating system (Windows, macOS, or Linux).
- Download the latest version of Git for your OS.
Install Git
Windows:
- Run the downloaded `.exe` file.
- Follow the installation prompts.
- During installation, you will be asked to choose options. It's recommended to:
- Use the default editor as VS Code.
- Choose the default settings for most options.
- After installation, open the Command Prompt/Terminal and type
git --versionto check if Git is installed correctly.
macOS:
- Run the downloaded `.dmg` file and follow the instructions.
- Alternatively, you can install Git using Homebrew by opening the Terminal and typing:
brew install gitgit --version in the Terminal.Linux (Ubuntu/Debian):
- Open the Terminal and run the following command to install Git:
sudo apt install gitgit --version.Configuring Git in VS Code Terminal
Follow these steps to configure Git directly in the VS Code terminal:
- Open VS Code and the integrated terminal
- On Windows/Linux: Press
Ctrl + ` - On macOS: Press
Cmd + `
- On Windows/Linux: Press
- Check if Git is installed
In the terminal, type the following command:
git --versionIf Git is installed, you'll see the version number. If Git is not installed, you will need to install Git first.
- Configure Git Username and Email
Set up your username (this name will appear with your commits) by typing:
git config --global user.name "Your Name"Set up your email address (this will be associated with your commits) by typing:
git config --global user.email "your.email@example.com" - Verify the Configuration
To ensure Git is configured correctly, run:
git config --listThis will display all your Git settings, including your username and email.
Troubleshooting
If you encounter any issues during the installation, refer to the official Git documentation for help: Git Documentation.
Registering on GitHub
GitHub is a platform for version control and collaboration, allowing multiple people to work on projects simultaneously. It's widely used by developers and researchers for managing code, tracking changes, and working on collaborative projects.
In our workshops, we'll guide you through using GitHub, but getting familiar with it beforehand can be helpful. "Hello World" intro course if you're new to the platform.
- Visit the GitHub website.
- Click on Sign up in the top right corner.
- Follow the prompts to enter your information and complete the registration process.
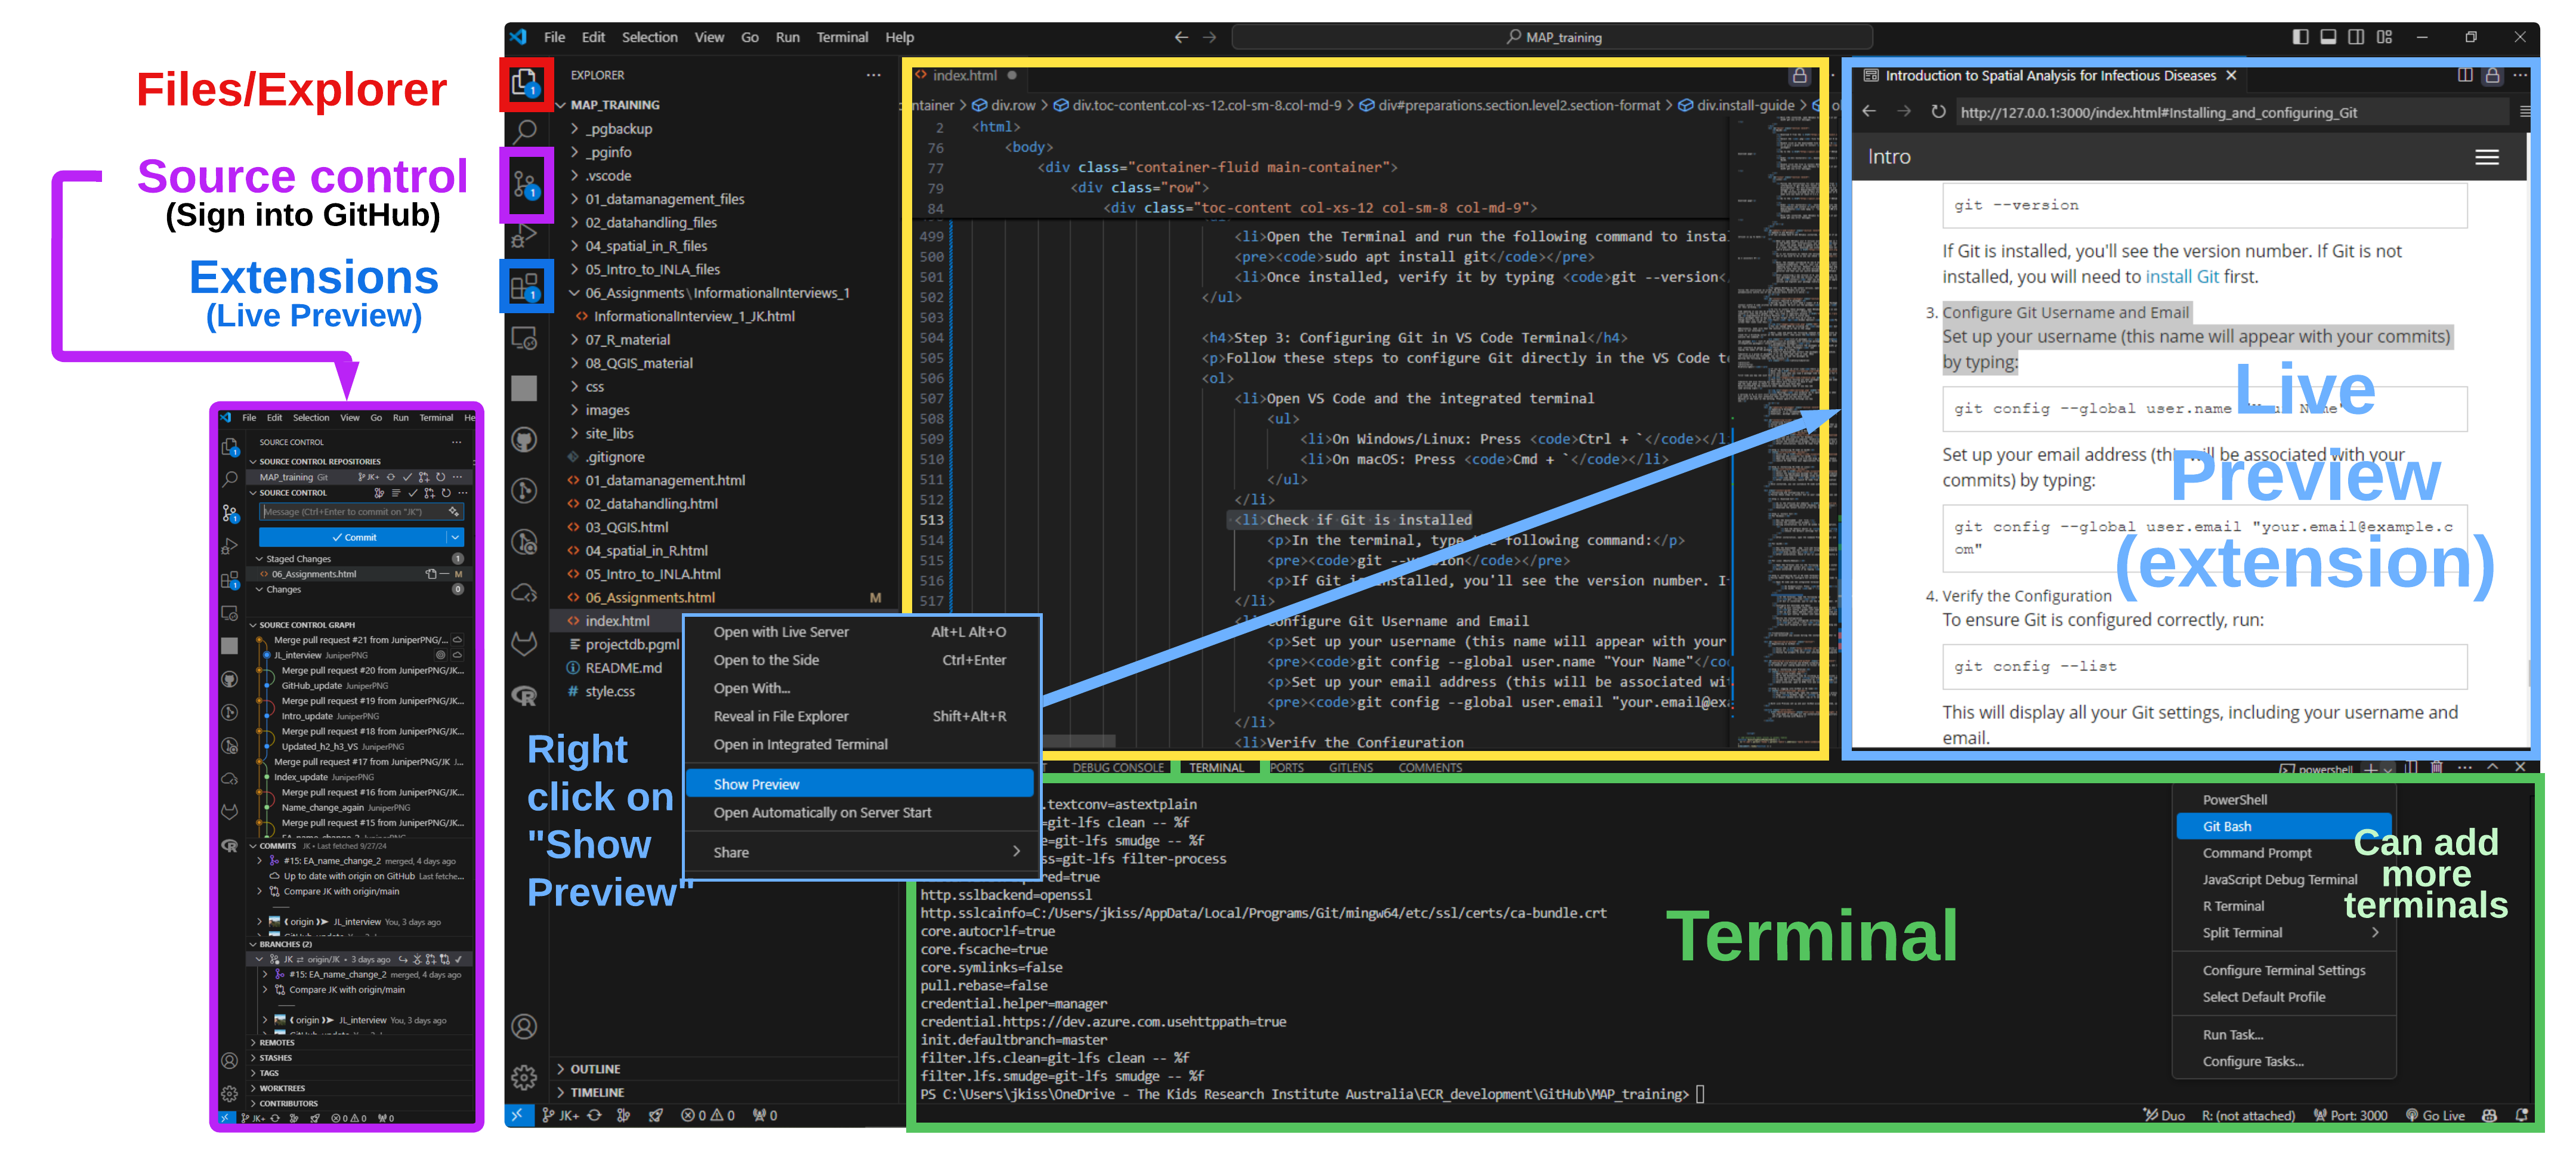
Setting Up Live Preview and GitHub Integration
To enhance your coding experience in Visual Studio Code, you can install the "Live Preview" extension, which allows you to see your HTML files in action in real time. Additionally, connecting your GitHub account will enable you to manage your repositories directly from the editor.
Step 1: Installing Live Preview
- Open Visual Studio Code.
- Go to the Extensions view by clicking on the Extensions icon in the Activity Bar on the side or by pressing
Ctrl + Shift + X. - In the search bar, type Live Preview and press
Enter. - Locate the Live Preview extension by MS-CEINTL and click the
Installbutton. - Once installed, open an HTML file and click the
Live Previewbutton in the status bar at the bottom of the window to start previewing your work in real time.
Step 2: Logging into GitHub in VS Code
- In Visual Studio Code, open the Command Palette by pressing
Ctrl + Shift + P. - Type GitHub: Sign in and select it from the dropdown.
- A browser window will open. Log in to your Git
With Live Preview set up and your GitHub account connected, you are now ready to enhance your coding workflow and easily manage your projects.
Behind the Scenes of this GitHub page:
You have made it through all the installations and registrations - congrats!
Let's get started with Module 1 😊